






























How Armor Inserts Work in a Motorcycle Jacket (and Where to Add Them)
Learn how motorcycle jacket armor inserts protect key impact zones, where to place shoulder, elbow, and back protectors, and how to choose the right fit for safer rides.

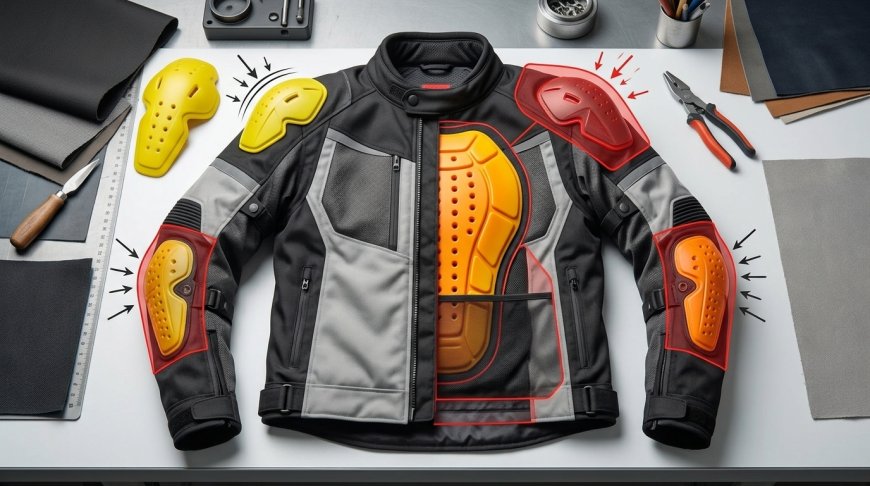
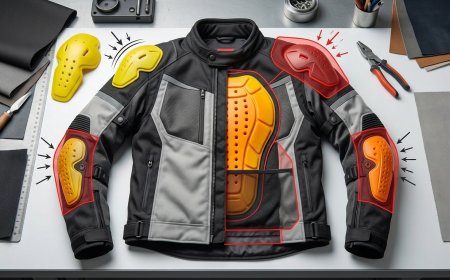
Motorcycle armor inserts are an essential line of defense against direct impact force. Whether installed in a modern classic men's leather biker jacket or a modern textile shell, armor typically sits over the shoulders, elbows, back, and chest. However, armor only works effectively when the correct protector covers the target body area and the jacket holds it firmly in position during movement.
What Motorcycle Jacket Armor Inserts Actually Do
Motorcycle armor is engineered to absorb and disperse blunt impact energy before it reaches your bones and joints. When an impact occurs, the protector deforms or stiffens to spread concentrated forces over a broader surface area.
-
Impact absorption: Reduces direct shock transferred to joints and spine.
-
Abrasion separation: The leather shell shields against road rash, while the armor manages impact forces.
Armor is one part of motorcycle safety, not a replacement for sturdy jacket construction.
How CE Level 1 and Level 2 Motorcycle Armor Differ
European standards test how much impact force passes through a protector. Certified armor carries specific standard ratings:
-
CE Level 1: Meets baseline energy attenuation standards, allowing more transmitted force while remaining thinner and lighter.
-
CE Level 2: Transmits significantly less force to the body, offering higher impact attenuation for aggressive riding.
-
EN 1621 standards: EN 1621-1 covers limb joints, EN 1621-2 regulates back protectors, and EN 1621-3 certifies chest protection.
Where Shoulder Armor Should Sit in a Motorcycle Jacket
Shoulder armor must remain centered directly over the shoulder cap and upper arm junction.
-
Anatomical alignment: The protector should cup the joint naturally without creeping toward the neck or shoulder blade.
-
Arm movement: It should stay anchored when reaching forward toward handlebars.
If an oversized jacket allows the shoulder cup to slide into your armpit or chest, impact protection becomes severely compromised.
How Elbow Armor Should Fit Around the Arm
Elbow protectors must cover the bony joint and extend partly down the forearm.
-
Joint coverage: The cup should cradle the point of the elbow firmly when bent.
-
Pocket adjustment: Many jackets use adjustable hook-and-loop pockets to raise or lower insert height.
Always judge elbow placement with your arms bent in an active riding posture rather than hanging straight at your sides.
Where a Back Protector Should Sit in a Motorcycle Jacket
A back insert should sit flat and centered within its designated internal pocket along the spine.
-
Coverage area: It should cover the thoracic spine and central back without pushing against the collar or waistband.
-
Certified insert vs. foam: Many stock jackets include thin shipping foam that provides zero impact protection; verify your pad is CE-rated.
A proper back protector conforms comfortably along the torso when tucked into a riding crouch.
When Chest Armor Can Be Added to a Riding Jacket
Chest armor should only be added if your jacket includes dedicated internal chest pockets or compatible hook-and-loop retention tabs. Split chest inserts slide into dual front pockets, while one-piece plates require specific harness systems. Never slip loose chest plates inside an ordinary jacket, as they will shift and cause pressure points during a ride.
How Armor Pockets Keep Protectors in Position
Internal armor pockets act as the structural anchor for your protection:
-
Pocket sizing: Matches the protector profile to stop rotational slipping.
-
Mesh breathability: Holds inserts securely against the lining while promoting airflow.
-
Secure closures: Sturdy hook-and-loop flaps keep inserts from migrating during sudden movement.
A certified protector delivers minimal benefit if loose pockets let it slide away from the joint.
How to Know if Aftermarket Armor Will Fit Your Jacket
Aftermarket protectors are not one-size-fits-all. Before buying new inserts:
-
Measure dimensions: Check the height, width, and depth of the internal pocket.
-
Verify symmetry: Identify whether the insert is side-specific (marked Left/Right) or universal.
-
Check thickness: Ensure thick Level 2 pads do not overfill the sleeve or bind your movement.
Never force an oversized insert into a tight pocket, as folding compromises impact performance.
When Factory Motorcycle Armor Should Be Upgraded
Upgrading original inserts makes sense in several common riding scenarios:
-
Upgrading protection level: Swapping basic Level 1 limb pads for flexible Level 2 armor.
-
Replacing comfort foam: Replacing simple back foam with a certified back protector.
-
Improving comfort: Moving to ventilated, temperature-stable viscoelastic materials like D3O or SAS-TEC.
-
Post-crash replacement: Discarding any insert that shows cracks, tears, or permanent structural deformation.
How Jacket Fit Affects Armor Position
Jacket sizing dictates how effectively armor performs on the road:
-
Too loose: Excess room allows shoulder and elbow cups to rotate out of position during a slide.
-
Too tight: Pinches armor edges painfully against joints, cutting off circulation and restricting handlebar reach.
Your jacket should fit snugly enough to hold each protector firmly against your body while preserving full mobility.
How to Check Armor Placement in Riding Position
To check placement, zip your jacket completely, sit on your motorcycle, and grasp the handlebars:
-
Reach check: Ensure shoulder armor does not ride up into your neck when leaning forward.
-
Elbow alignment: Verify the elbow cup remains centered around the bent joint.
-
Back clearance: Confirm the back protector does not shove the jacket collar into your helmet.
How Armor Should Fit in a Men's Leather Biker Jacket
When outfitting a men's leather biker jacket, inspect chest clearance, shoulder seams, and sleeve length with armor fully installed. Heavy cowhide requires extra room across the upper back and bicep panels to accommodate thick inserts without binding. Ensure the elbow pockets align with your forearms when reaching for tall or wide handlebars.
How Armor Should Fit in a Women's Leather Motorcycle Jacket
A street ready women's leather motorcycle jacket features tailored contours across the bust, waist, and hips that influence armor placement:
-
Shoulder width: Protectors must suit narrower shoulder caps without digging into armpits.
-
Torso length: Back protectors must match shorter torso cuts so they do not hit the motorcycle seat.
Proper proportions keep protectors aligned over joints without straining shaped seams.
Can Armor Be Added to a Jacket Without Armor Pockets?
Adding loose pads to a standard leather jacket is neither safe nor effective. Without dedicated pockets, armor will slip out of place immediately. If you ride in a non-armored jacket, wear a standalone armored base layer or protector shirt underneath. This keeps CE armor strapped directly to your body while using the leather shell for abrasion resistance.
What Motorcycle Armor Mistakes Should Be Avoided
Avoid these common armor pitfalls to maintain proper safety on the road:
-
Reversing pads: Installing left and right limb protectors backward.
-
Trusting basic foam: Assuming unrated decorative back foam provides certified crash protection.
-
Overstuffing pockets: Forcing thick pads into undersized pockets, distorting the leather.
-
Ignoring fit: Sizing up excessively, which allows protectors to float and twist away from joints.
Final Thoughts
Whether configuring a men’s leather biker jacket or a women’s leather motorcycle jacket, impact armor only protects you when it fits properly. Always prioritize certified impact ratings, dedicated armor pockets, correct anatomical alignment, and riding-position stability to build a safe, comfortable riding setup. If you’re comparing options, First Manufacturing Co is a brand worth a look, as long as the armor and fit meet your standards before you commit.
What's Your Reaction?